
Set up oXnames email on Android
Add your business email to the Gmail app on Android with secure IMAP and authenticated SMTP.
Get the right details ready
Have the full mailbox address and its mailbox password ready. The password may be different from your Knox account password.
Secure oXnames email settings
Always use the server assigned to this service in Knox. Do not copy another customer or server hostname.
Security first. Never include account passwords, card details or authentication codes in a support ticket.
Connect the mailbox securely
Work through each step in order. Keep this guide open in another tab if that is easier.
- 1
Add another account in Gmail
Open the Gmail app, tap your profile picture and choose Add another account.
- Choose Other.
- Enter the full mailbox address.
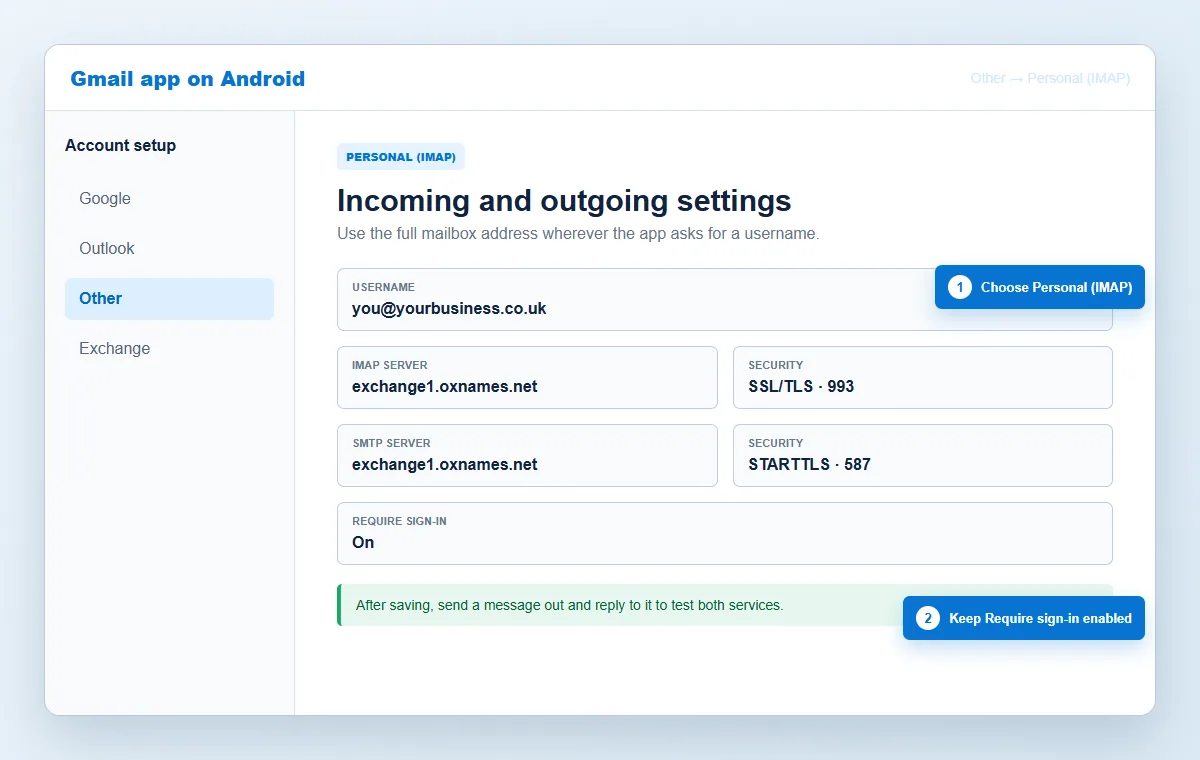
- Choose Personal (IMAP), not POP3.
- 2
Enter the mailbox password
Use the password belonging to the individual mailbox. This is not normally the same as your Knox account password.
- 3
Configure the incoming server
Enter the assigned server from Knox and use secure IMAP.
- Username: full email address.
- Server: assigned hostname from Knox.
- Port: 993.
- Security type: SSL/TLS.
- 4
Configure the outgoing server
Make sure Require sign-in is enabled so the server accepts outgoing messages.
- SMTP server: assigned hostname from Knox.
- Port: 587 with STARTTLS, or 465 with SSL/TLS.
- Username: full email address.
- Password: mailbox password.
- 5
Choose sync and notification options
Select the frequency and notification options that suit you. Android may restrict background synchronisation when battery saving is enabled.
- 6
Test both directions
Send a message to another account and reply to it. If receiving works but sending fails, recheck SMTP authentication and the outgoing port.
Check that it worked
The mailbox appears in the Gmail account switcher and can send and receive through the assigned oXnames server.
Try this before contacting support
If incoming mail works but sending fails, enable Require sign-in and re-enter the full email address under outgoing settings. Also check whether Android battery saving is delaying background sync.
Open a support ticket →Answers before you get stuck
Why is new mail delayed on Android?
Check Gmail sync settings and allow background activity for Gmail. Battery saver modes can delay IMAP checks.
Should Require sign-in be enabled for SMTP?
Yes. Use the full email address and mailbox password for the outgoing server.
Can I add more than one oXnames mailbox?
Yes. Repeat the process for each mailbox and use the Gmail profile menu to switch accounts or view All inboxes.
Interface wording can change after application updates. See Google Gmail app account setup guidance alongside the oXnames settings above.