
Set up oXnames email in Thunderbird
Configure Mozilla Thunderbird manually with secure IMAP, SMTP authentication and your assigned oXnames mail server.
Get the right details ready
Have the full mailbox address and its mailbox password ready. The password may be different from your Knox account password.
Secure oXnames email settings
Always use the server assigned to this service in Knox. Do not copy another customer or server hostname.
Security first. Never include account passwords, card details or authentication codes in a support ticket.
Connect the mailbox securely
Work through each step in order. Keep this guide open in another tab if that is easier.
- 1
Open account setup
Open Thunderbird, choose the application menu, Account Settings, Account Actions and Add Mail Account.
- Enter your display name.
- Enter your full email address.
- Enter the mailbox password and choose Continue.
- 2
Choose Manual configuration
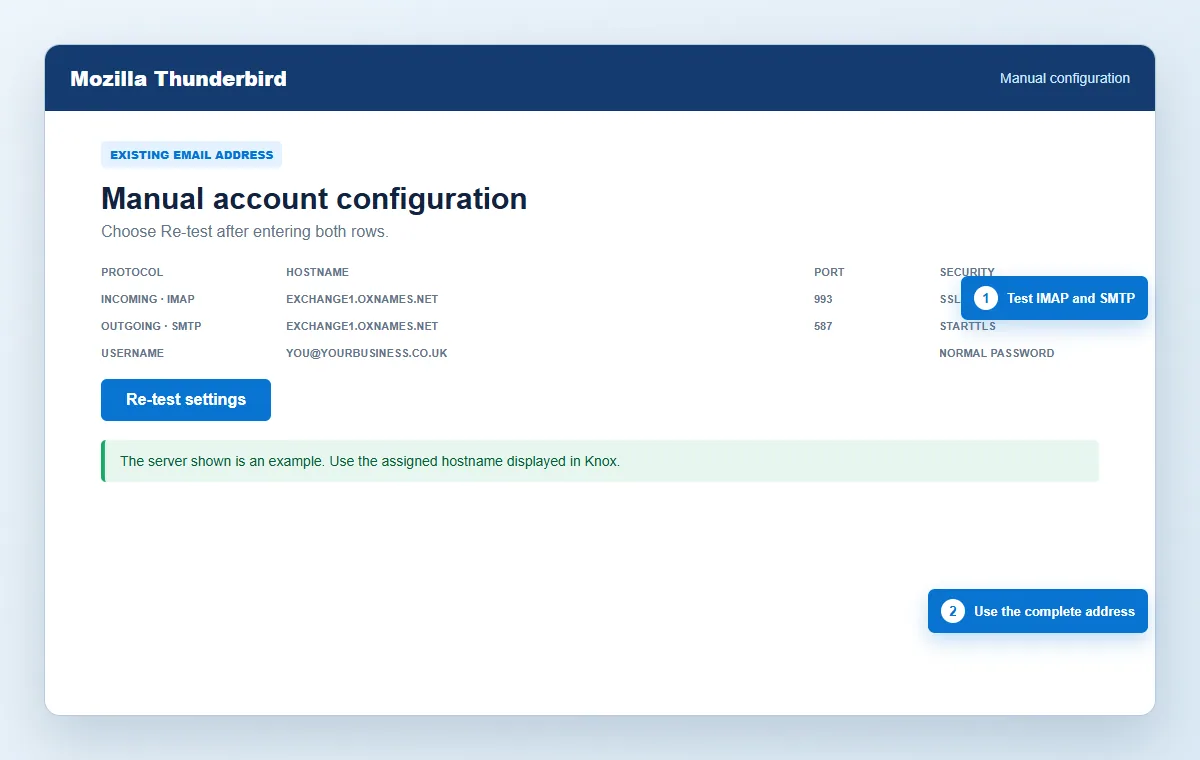
If Thunderbird does not detect the settings correctly, select Manual configuration and replace every suggested server with the assigned hostname shown in Knox.
- 3
Configure IMAP
Set the incoming protocol to IMAP, server to the assigned hostname, port to 993 and connection security to SSL/TLS.
- Authentication: Normal password.
- Username: full email address.
- 4
Configure SMTP
Set the outgoing server to the assigned hostname, port to 587 and connection security to STARTTLS. Port 465 with SSL/TLS is the alternative.
- Authentication: Normal password.
- Username: full email address.
- 5
Retest and save
Choose Re-test. When Thunderbird confirms both services, choose Done and allow the initial folder synchronisation to complete.
- 6
Send a test message
Send to another address and reply. If Thunderbird receives but cannot send, open Outgoing Server (SMTP) and confirm the correct SMTP profile is assigned to this mailbox.
Check that it worked
Thunderbird confirms both servers and begins downloading the mailbox folder list over IMAP.
Try this before contacting support
Open Account Settings and confirm this mailbox is assigned to the correct Outgoing Server (SMTP) entry. A working incoming configuration does not automatically prove that SMTP is correct.
Open a support ticket →Answers before you get stuck
What authentication method should I choose?
Choose Normal password over an encrypted SSL/TLS or STARTTLS connection. Never choose No authentication for SMTP.
Why is Thunderbird using the wrong outgoing server?
Open Account Settings, select the mailbox and choose the correct entry in the Outgoing Server (SMTP) list.
How long does the first synchronisation take?
That depends on mailbox size and connection speed. Large mailboxes may continue downloading folders after the account has been added successfully.
Interface wording can change after application updates. See Mozilla Thunderbird manual configuration guidance alongside the oXnames settings above.